Using TensorFlow Go to serve an object detection model with a web service
Building a web service to serve a MobileNet object detection model with TensorFlow Go.

The term TensorFlow goes beyond Python and neural networks. Behind that trendy word, there's a complete ecosystem made of several frameworks, projects, and even hardware. One of these projects is TensorFlow Go. This TensorFlow API for Go excels at loading and deploying models within a Go program, models created with the Python counterpart. In this tutorial, we will see an example of this. The goal here is creating a web server in Go that serves an object detection model trained in TensorFlow.
Installing TensorFlow Go
Installing TensorFlow Go requires downloading the package using
$ go get github.com/tensorflow/tensorflow/tensorflow/go
Additionally, you need to install the TensorFlow C library. Installing it is not that straightforward, so to avoid sidetracking, I won't discuss it here. You can find the instructions at https://www.tensorflow.org/install/lang_c.
The project's design
For this first iteration, I'm only adding one object detection model to the project. However, I implemented the functionalities as packages in case I decide to add extra models in the future. If that happens, I'll reuse parts of the code or refactor others as interfaces.
The model
The model we will serve is an SSD MobileNet object detection model trained on the COCO dataset obtained from http://download.tensorflow.org/models/object_detection/ssd_mobilenet_v1_coco_2018_01_28.tar.gz. "But Juan, MobileNet, SSD, and COCO. What does that mean?" Glad you asked! I'll briefly explain the terms starting with MobileNet.
MobileNet (Howard et al.) is a family of light machine learning models that trade accuracy for speed and performance. As the name implies, MobileNet is designed to be used in mobile or embedded devices. SSD, which stands for Single Shot MultiBox Detector (Liu et al.), refers to a method for detecting objects using a single neural network. The counterpart of this "single-shot" method is an architecture that uses an extra component known as the "proposal generator" to find regions of interest with an image. Last, we have COCO, short for "Common Objects in Context" (Lin et al.), the dataset used to train the model. The COCO dataset is a collection of over 200k labeled images separated across 90 classes that include "bird, "cat," "person," and "car."
The service
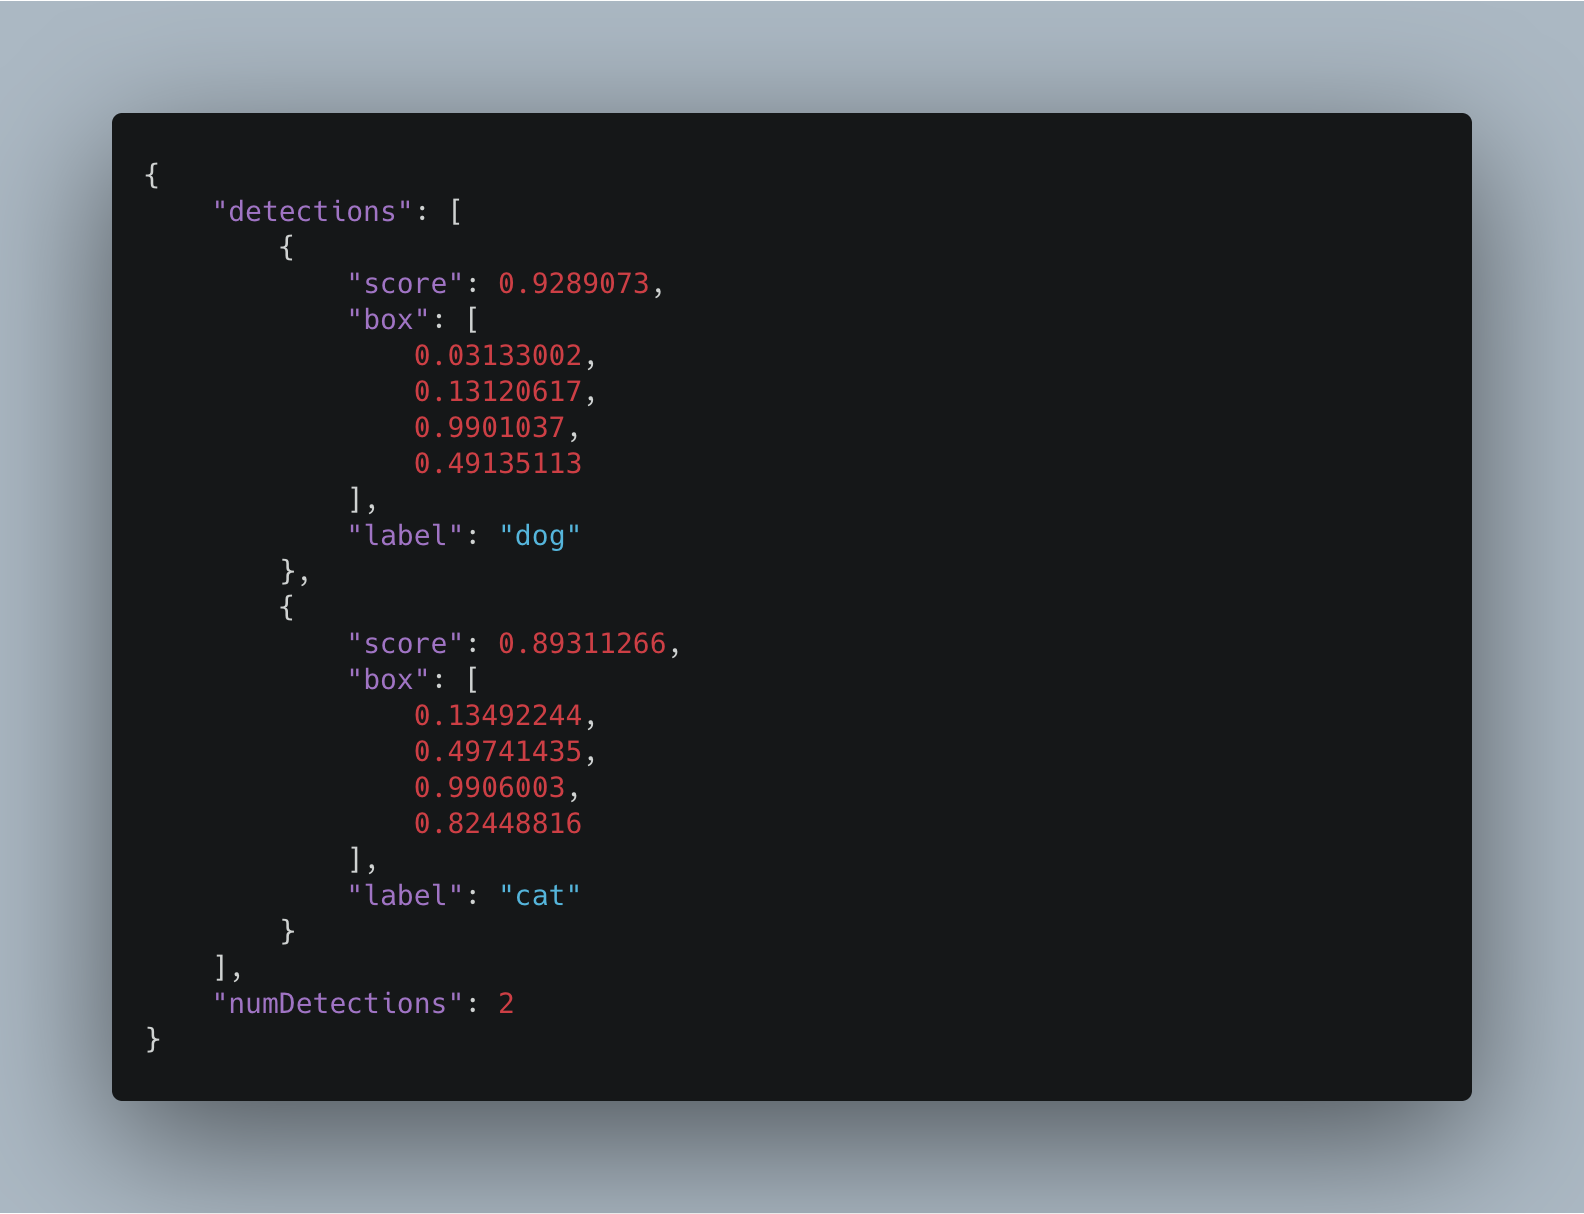
The service we will build has one endpoint – predict — which takes as argument the path to an image. Its response is a JSON that has the following fields:
detections: An array of the detected objects that include the following keys:score: the detection's confidence score.box: the bounding box ([yMin, xMin, yMax, xMax]) of the detected object. This number is not the pixel position of the detection. Instead, the returned value is the position in relation to the width and length of the image. For example, in an image of size [400, 200], an object located at its vertical center has ayMinvalue of 0.5 (Figure 1).label: the COCO class of the detected object.
numDetections: the total number of detections.
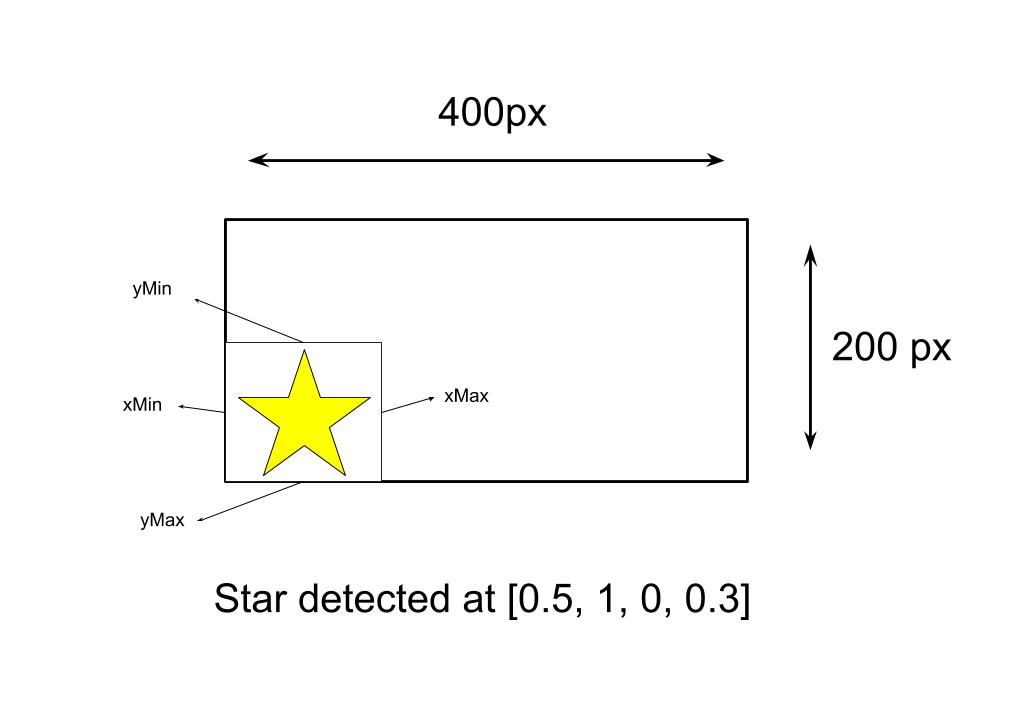
Figure 2 presents an example of a response.
Building the service
Downloading the model
Start the tutorial by downloading the model from here http://download.tensorflow.org/models/object_detection/ssd_mobilenet_v1_coco_2018_01_28.tar.gz. Then untar the file. Inside the directory, you fill several files, which include metadata about the model, the training configuration file (this is from TensorFlow's Object Detection API), checkpoint, and others. From all of these, you only need the directory saved_model/. So copy it, and paste it in your working directory.
Loading the model
With the model downloaded, the next step is loading it in TensorFlow Go. In the working directory, create a new folder and name it models. Inside, create a file coco_ssd_mobilenet.go. Then add the following code:
package models

import (
    "fmt"
    "strings"

    "github.com/juandes/tensorflow-models/responses"
    tf "github.com/tensorflow/tensorflow/tensorflow/go"
)

// Coco is a MobileNet V1 model trained on the COCO dataset.
type Coco struct {
    model  *tf.SavedModel
    labels []string
}

const path = "static/models/ssd_mobilenet_v1_coco_2018_01_28/"

// NewCoco returns a Coco object
func NewCoco() *Coco {
    return &Coco{}
}
At the very top, we have the package's name, imports, and a struct Coco where we will add the model. After the struct is the path to the file and a constructor that creates the struct. Pretty standard Go. Then it gets interesting.
The struct's first method, Load(), loads the model. Its first line tf.LoadSavedModel(), uses as arguments the path to the model, a list of tags, and a SessionOptions object we don't currently need.:
// Load loads the ssd_mobilenet_v1_coco_2018_01_28 SavedModel.
func (c *Coco) Load() error {
    model, err := tf.LoadSavedModel(path, []string{"serve"}, nil)
    if err != nil {
        return fmt.Errorf("Error loading model: %v", err)
	}
    c.model = model

    return nil
}
Wait, tags? What's that?
The SavedModel Tags and Signature
A TensorFlow SavedModel, such as ours, can have more than one graph. So, to identify them, these graphs are associated with tags. Therefore, when loading the model, you need to specify the graph you which to use. For this example, we want the tag "serve," the one that predicts. To see a SavedModel's tags, plus other information of the model we will use soon, you need the tool saved_model_cli, which comes with the TensorFlow installation. To use it, execute the following command:
$ saved_model_cli show --dir PATH/TO/MODEL/ssd_mobilenet_v1_coco_2018_01_28 --all
Figure 3 below presents the output.
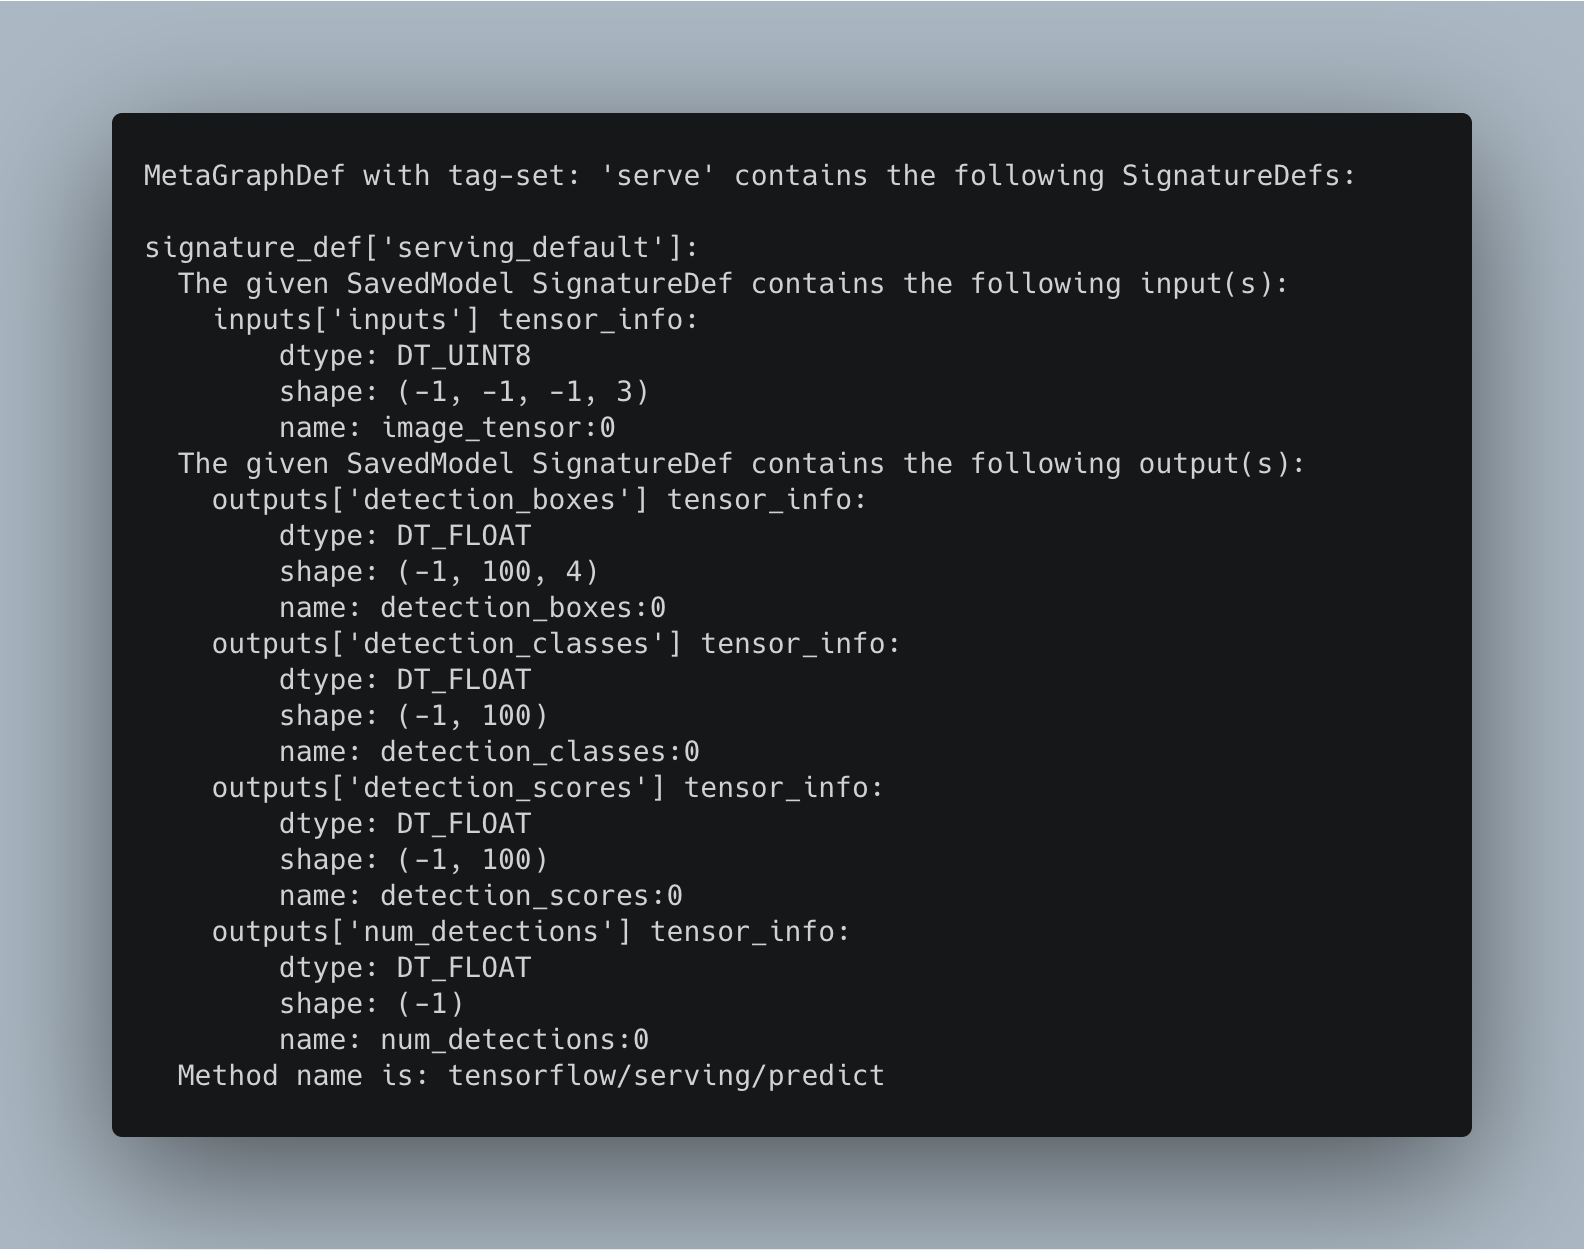
What we have above is the signature of the tag "serve." The SavedModel signature defines the input and outputs of the model. This model's input is a tensor with the name "image_tensor" whose dtype is UINT8 and input shape (-1, -1, -1, 3) (a batch of colored images of any size). As for the outputs, they are the same values we are returning in the JSON response (detection_boxes, detection_classes, detection_scores, and num_detections).
For more information about SavedModel visit https://www.tensorflow.org/guide/saved_model
Reading the labels
After loading the model, the next step is reading the labels file. The Coco model has 91 classes, and so, the model's output is a number between 1 and 91. But this value is meaningless to a user. If you would show it to me, I'll be like, "what is this number? I need the actual label." Therefore, I collected the dataset's labels under one file named labels.txt with the goal is mapping the model's output to a label:
func readLabels(labelsFile string) ([]string, error) {
    fileBytes, err := ioutil.ReadFile(labelsFile)
    if err != nil {
	    return nil, fmt.Errorf("Unable to read labels file: %v", err)
    }

    return strings.Split(string(fileBytes), "\n"), nil
}
Above is the function readLabels() . This function reads the labels file and returns them as a string slice. To use the function, add a call to it from Load():
func (c *Coco) Load() error {
    model, err := tf.LoadSavedModel(path, []string{"serve"}, nil)
    if err != nil {
        return fmt.Errorf("Error loading model: %v", err)
    }
    c.model = model
    c.labels, err = readLabels(strings.Join([]string{path, "labels.txt"}, ""))
    if err != nil {
        return fmt.Errorf("Error loading labels file: %v", err)
    }
    return nil
}
Predicting
Now comes the cool part: predicting. To summarize, predicting involves taking the input image, converting it to a tensor, and then feeding it to the model. As we saw in the model's signature, after predicting, it produces four tensors detection_boxes, detection_classes, detection_scores, and num_detections. These values are the information the user will receive:
func (c *Coco) Predict(data []byte) *responses.ObjectDetectionResponse {
    tensor, _ := makeTensorFromBytes(data)

    output, err := c.model.Session.Run(
        map[tf.Output]*tf.Tensor{
            c.model.Graph.Operation("image_tensor").Output(0): tensor,
        },
        []tf.Output{
            c.model.Graph.Operation("detection_boxes").Output(0),
            c.model.Graph.Operation("detection_classes").Output(0),
            c.model.Graph.Operation("detection_scores").Output(0),
            c.model.Graph.Operation("num_detections").Output(0),
        },
        nil,
    )

    if err != nil {
        fmt.Printf("Error running the session: %v", err)
        return nil
    }

    outcome := responses.NewObjectDetectionResponse(output, c.labels)
    return outcome
}
Predict() has one parameter []byte, which represents the image. In the function's first line, we will use the []byte and convert it to tensor using the upcoming function makeTensorFromBytes(). Then, we execute the graph using the Run() method and the just-converted tensor as input. As for the output, use a []tf.Output slice with all the possible outputs of the model. Following this, there's the function responses.NewObjectDetectionResponse() to encapsulate the output values within a struct. Before getting into the details, let's first see makeTensorFromBytes():
// Convert the image in filename to a Tensor suitable as input
func makeTensorFromBytes(bytes []byte) (*tf.Tensor, error) {
    // bytes to tensor
    tensor, err := tf.NewTensor(string(bytes))
    if err != nil {
        return nil, err
    }

    // create batch
    graph, input, output, err := makeBatch()
    if err != nil {
        return nil, err
    }

    // Execute that graph create the batch of that image
    session, err := tf.NewSession(graph, nil)
    if err != nil {
        return nil, err
    }

    defer session.Close()

    batch, err := session.Run(
        map[tf.Output]*tf.Tensor{input: tensor},
        []tf.Output{output},
        nil)
    if err != nil {
        return nil, err
    }
    return batch[0], nil
}
The function makeTensorFromBytes() taken (and slightly modified) from here, converts a []byte to a tensor. Inside of it is a call to makeBatch(), a function that adds an extra dimension to a tensor and converts it into a batch of size 1 (remember the input shape 4th-dimensional input shape):
// makeBatch uses ExpandDims to convert the tensor into a batch of size
func makeBatch() (graph *tf.Graph, input, output tf.Output, err error) {
    s := op.NewScope()
    input = op.Placeholder(s, tf.String)

    output = op.ExpandDims(s,
        op.DecodeJpeg(s, input, op.DecodeJpegChannels(3)),
        op.Const(s.SubScope("make_batch"), int32(0)))
    graph, err = s.Finalize()
    return graph, input, output, err
}
Last, we need a method CloseSession() to end the session:
// CloseSession closes a session.
func (c *Coco) CloseSession() {
    c.model.Session.Close()
}
Preparing the response
After predicting and getting the result, we need to extract the values and make them presentable for the user. To achieve this, I created a new package called responses, and added in it an ObjectDetectionResponse struct made of a list of the detections and the number of detections:
package responses

import (
    tf "github.com/tensorflow/tensorflow/tensorflow/go"
)

// ObjectDetectionResponse is the response the user receives after requesting an
// object detection prediction
type ObjectDetectionResponse struct {
    Detections    []detection `json:"detections"`
    NumDetections int         `json:"numDetections"`
}

type detection struct {
    Score float32   `json:"score"`
    Box   []float32 `json:"box"`
    Label string    `json:"label"`
}

const threshold = 0.50

// NewObjectDetectionResponse creates an ObjectDetectionResponse
func NewObjectDetectionResponse(output []*tf.Tensor, labels []string) *ObjectDetectionResponse {
    detectionsAboveThreshold := 0

    detections := []detection{}

    // Use type assertion to get the values of the output tensor.
    outputDetectionBoxes := output[0].Value().([][][]float32)
    outputDetectionClasses := output[1].Value().([][]float32)
    outputDetectionScores := output[2].Value().([][]float32)
    numDetections := int(output[3].Value().([]float32)[0])

    for i := 0; i < numDetections; i++ {
        if outputDetectionScores[0][i] < threshold {
            continue
        }

        detectionsAboveThreshold++

        detection := detection{
            Score: outputDetectionScores[0][i],
            Box:   outputDetectionBoxes[0][i],
            Label: labels[int(outputDetectionClasses[0][i]-1)],
        }
        detections = append(detections, detection)
    }

    return &ObjectDetectionResponse{
        Detections:    detections,
        NumDetections: detectionsAboveThreshold,
    }
}
The most important part here is the NewObjectDetectionResponse function, responsible for creating the response. This function has two parameters: the output tensor and the labels list. The output tensor is used alongside several type assertion statements to get their values. Then, in a loop, we iterate numDetections times, checking every time if the confidence of the detection is below a given threshold. If true, we continue. Otherwise, create an instance of detection made of the score, bounding box, and label and add it to a list of detection. At the end of the function, return the ObjectDetectionResponse object.
The web service
And thus, we arrive at the last part: the web service. As shown in the example above, the service has one POST method that receives an image and returns the ObjectDetectionResponse as a JSON:
package main

import (
    "encoding/json"
    "fmt"
    "io/ioutil"
    "net/http"
    "strconv"

    "github.com/gorilla/mux"
    "github.com/juandes/tensorflow-models/models"
)

var model *models.Coco

const port = 8080

func main() {
    model = models.NewCoco()
    err := model.Load()
    if err != nil {
        fmt.Printf("Error loading model: %v", err)
        panic(err)
	}

    defer model.CloseSession()
    router := mux.NewRouter()
    router.
        Path("/predict").
        Methods("POST").
        HandlerFunc(predict)

    fmt.Printf("Listeing on port %d", port)
    http.ListenAndServe(fmt.Sprintf(":%s", strconv.Itoa(port)), router)
}

func predict(w http.ResponseWriter, r *http.Request) {
    file, _, err := r.FormFile("data")
    if err != nil {
        http.Error(w, "Unable to get file", http.StatusInternalServerError)
        return
	}

    fileBytes, err := ioutil.ReadAll(file)
    if err != nil {
        http.Error(w, "Unable to read file", http.StatusInternalServerError)
        return
	}

    outcome := model.Predict(fileBytes)
    w.Header().Set("Content-Type", "application/json")
    json.NewEncoder(w).Encode(outcome)
}
The first of the two functions, main() loads the model and set up the service. While the second one, the handler function predict(), receives the image and performs the prediction.
To run the server, execute $ go run main.go. To test, execute run a curl command like this curl -F "data=@PATH/TO/IMAGE" http://localhost:8080/predict.
Enjoy!
Recap
TensorFlow is a vast ecosystem made up of multiple platforms. One of these, TensorFlow Go, is capable of executing graphs produced by its counterparts, such as TensorFlow (Python) and TensorFlow.js. In this tutorial, we built a program that loads an object detection MobileNet model and serves it with a web service.
The project can be used as a library. If you wish to use it, run $ go get github.com/juandes/tensorflow-go-models/models. To test, you could use the web server code presented above. In the future, I'd like to add more models to the project and convert some of the methods we used to interfaces. That way, we could easily extend the project to support more models. If you would like to experiment and add a new model, feel free to submit your PR.
The complete source code is available at https://github.com/juandes/tensorflow-go-models
Feature photo by Jannis Brandt on Unsplash.
PS: I'm looking for a new job :D you can find my CV at https://drive.google.com/file/d/1OwO8MBih_4Rr28ws14_rwM00NY7CWqgN/view?usp=sharing